Well where has the year gone...
Largely dissolved between work, buying and selling houses, moving into Melbourne and setting up in a new place.
I'm starting to get back under control, well apart from being away four out of the next five weeks that is!
Last weekend I managed to get to a Victorian N Scale Collective meeting at Luke's the owner of this blog
http://bendigonscale.blogspot.com.au/
Luke is doing really impressive work in 3D rapid prototyping, and it was great to see the vision (or madness?!) he has planned.
Well enough for now, back to sorting out the garage to make it habitable for Aust-N-Rail!
Cheers
Rob
Monday, September 15, 2014
Saturday, February 8, 2014
Design Guidelines for Shapeways prints in N scale
G'Day, here are some guidelines for N scale model trains based on my experiences with Cubify Design and printing through Shapeways
First you really need to determine what sort of material you are going to use for your model, as this sets many of the parameters. I focus on two types:
White Strong and Flexible (WSF) is the cheaper model, has a rougher surface finish, and about half the resolution. It is great for making things like underframes (like on my Z tram) for inside models. I also use it for things like buffers ad the surface texture helps to give a bit of a wood like feel.
Frosted Ultra Detail (FUD) is the go to material for anything requiring detail. It is a bit more brittle, has a great finish and takes detail at 0.1x0.1mm.
Shapeways has a guide to features, which is occasionally changed. Key elements for FUD as of Feb 2014 are:
Minimum supported wall thickness 0.3mm (a supported wall has other walls on two or more sides).
Minimum unsupported wall 0.6mm (for wagon sides)
Minimum supported wire 0.6mm (useful for stays and break gear where it has support on both ends)
Minimum unsupported wire 0.8 mm
Minimum emboss detail 0.1x0.1mm (like a rivet)
Minimum engraved detail 0.1x0.1 (for grooves in planking)
Now here are some practical guidelines. In general I have found a tendency too go to fine when designing, because you can.... when it is printed and painted slightly chunkier detail actually looks better. The best way to do this is to emboss out to at least 0.2 and 0.3 is better.
Rivets. I use 0.15 x0.15. I found that sometime 0.1x0.1 wouldn't print, and 0.2 x0.2 was a little big. Using 0.15x0.15 appears to solve it.
Model Walls. If you are going to cast the finished model then a minimum of 0.8mm for shorter walls (say under 1cm in height) is ok, but for coaches, locomotives, wagons it is best to aim for 1mm think walls, and more upto 2mm if you can to make a resilient model. So for the QN / QR models the alls are 0.8mm. For the end walls on the VFTY I went down to 0.7mm, however they have outside braces for strength.
Stakes. On the VFTY I have a 1.5mm x 1.6mm for the stake, which is pretty resilient, I "cut in" 02.mm from the edge and 0.4mm deep to give the U frame. technically 0.2mm is too thin for a "wall", however as it is attached to a decent feature it counts as embossed detail... a useful trick.
Embossed detail. I have fund that 0.1mm emboss is too thin, you loose the detail. It is best to emboss out at least 0.2mm.
Planking gaps. To model gaps between planks, use a width of 0.1mm but go for deeper cut of 0.2mm. Sometimes though this can be a bit "washed out" when printed so a width of 0.15mm may be better (I'm still testing this).
I have also been experimenting with the use of Micro-Trains 2001 couplers, these allow the riding height of the wagon to be lowered to a more correct height. The problem though, especially with bogies, is having enough wheel clearance underneath the wagon. After a bit of trial and error I have come up with the foillowing:

To give enough clearance there needs to be 1.7mm from the bogie bolster (where the bogie touches the underframe). You mount the 2001 coupler 1mm "down" from the bogie bolster. The coupler pad needs to be 6mm deep and 5.2mm wide. The coupler hole is 3.6mm in from the end of the wagon and 1mm in diameter.
You can see how I have cut away in the underframe to give the bogie room to swing, remember though you need 0.3mm "above" this for the floor (it is a "supported wall"). Therefore aim to have at least a 2mm thick "floor" from the bolster to the floor on the inside of the wagon. A normal Micro-Trains bogie pin is 2.7mm though, so best to try and have a total thickness at the bolster point of 3mm, to allow for the bogie pin hole to be 1.9mm diameter and 2.7mm deep; otherwise the pin will need to be trimmed, or the bogie pin hole will go through into the floor of the wagon.
Hope this is useful for other designers, please feel free to ask other questions.
Cheers
Rob
First you really need to determine what sort of material you are going to use for your model, as this sets many of the parameters. I focus on two types:
White Strong and Flexible (WSF) is the cheaper model, has a rougher surface finish, and about half the resolution. It is great for making things like underframes (like on my Z tram) for inside models. I also use it for things like buffers ad the surface texture helps to give a bit of a wood like feel.
Frosted Ultra Detail (FUD) is the go to material for anything requiring detail. It is a bit more brittle, has a great finish and takes detail at 0.1x0.1mm.
Shapeways has a guide to features, which is occasionally changed. Key elements for FUD as of Feb 2014 are:
Minimum supported wall thickness 0.3mm (a supported wall has other walls on two or more sides).
Minimum unsupported wall 0.6mm (for wagon sides)
Minimum supported wire 0.6mm (useful for stays and break gear where it has support on both ends)
Minimum unsupported wire 0.8 mm
Minimum emboss detail 0.1x0.1mm (like a rivet)
Minimum engraved detail 0.1x0.1 (for grooves in planking)
Now here are some practical guidelines. In general I have found a tendency too go to fine when designing, because you can.... when it is printed and painted slightly chunkier detail actually looks better. The best way to do this is to emboss out to at least 0.2 and 0.3 is better.
Rivets. I use 0.15 x0.15. I found that sometime 0.1x0.1 wouldn't print, and 0.2 x0.2 was a little big. Using 0.15x0.15 appears to solve it.
Model Walls. If you are going to cast the finished model then a minimum of 0.8mm for shorter walls (say under 1cm in height) is ok, but for coaches, locomotives, wagons it is best to aim for 1mm think walls, and more upto 2mm if you can to make a resilient model. So for the QN / QR models the alls are 0.8mm. For the end walls on the VFTY I went down to 0.7mm, however they have outside braces for strength.
Stakes. On the VFTY I have a 1.5mm x 1.6mm for the stake, which is pretty resilient, I "cut in" 02.mm from the edge and 0.4mm deep to give the U frame. technically 0.2mm is too thin for a "wall", however as it is attached to a decent feature it counts as embossed detail... a useful trick.
Embossed detail. I have fund that 0.1mm emboss is too thin, you loose the detail. It is best to emboss out at least 0.2mm.
Planking gaps. To model gaps between planks, use a width of 0.1mm but go for deeper cut of 0.2mm. Sometimes though this can be a bit "washed out" when printed so a width of 0.15mm may be better (I'm still testing this).
I have also been experimenting with the use of Micro-Trains 2001 couplers, these allow the riding height of the wagon to be lowered to a more correct height. The problem though, especially with bogies, is having enough wheel clearance underneath the wagon. After a bit of trial and error I have come up with the foillowing:
To give enough clearance there needs to be 1.7mm from the bogie bolster (where the bogie touches the underframe). You mount the 2001 coupler 1mm "down" from the bogie bolster. The coupler pad needs to be 6mm deep and 5.2mm wide. The coupler hole is 3.6mm in from the end of the wagon and 1mm in diameter.
You can see how I have cut away in the underframe to give the bogie room to swing, remember though you need 0.3mm "above" this for the floor (it is a "supported wall"). Therefore aim to have at least a 2mm thick "floor" from the bolster to the floor on the inside of the wagon. A normal Micro-Trains bogie pin is 2.7mm though, so best to try and have a total thickness at the bolster point of 3mm, to allow for the bogie pin hole to be 1.9mm diameter and 2.7mm deep; otherwise the pin will need to be trimmed, or the bogie pin hole will go through into the floor of the wagon.
Hope this is useful for other designers, please feel free to ask other questions.
Cheers
Rob
Tuesday, January 28, 2014
Painted VFTY and OR wagon
Here are the models painted up and decaled, only the weathering to go :) Click on them for larger pictures.

 Need to fit the handbrake wheel.

Cheers
Rob
Cheers
Rob
Monday, January 27, 2014
QN and Plateframe Bogie sample
I received a package from ShapeWays today:
 The QN ballast wagon.
The print is really nice and needed very little cleaning up, the rods underneath the wagon are very brittle though...
A couple of things to fix and then it will be ready for production

Will need to glue on couplers, or cut the screw.
 One Plateframe bogie fitted, Micro-Trains 36in wheels..
The Plateframe in undercoat.

The Micro-trains 36in wheels drop in and roll freely.
Cheers
Rob
The print is really nice and needed very little cleaning up, the rods underneath the wagon are very brittle though...
A couple of things to fix and then it will be ready for production
Will need to glue on couplers, or cut the screw.
The Plateframe in undercoat.
The Micro-trains 36in wheels drop in and roll freely.
Cheers
Rob
Monday, January 20, 2014
New Products from Peter Boormans Workshop N Class, F Class Blitz Truck
Recieved a package of new stuff from Pete today:
VLINE N Class
 This is the model in undercoat on a Kato SD40 chassis. Master is a 3D Rapid Prototype from Robbie Popovski.
 This is the other side direct from the package.
 The kit is comprehensive including lots of decals, etched handrails and lost wax horn (not pictured).
VR / VLINE F Class
This etch is designed for the Graham Farish 08, the latest version runs really well so I'm looking at dressing mine up some day...

Blitz Trucks
These are another 3D master.

VLINE N Class
VR / VLINE F Class
This etch is designed for the Graham Farish 08, the latest version runs really well so I'm looking at dressing mine up some day...
Blitz Trucks
These are another 3D master.
Wednesday, January 15, 2014
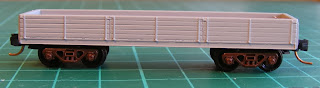
N scale VFTY
Here are the latest test prints on the VFTY timber wagon.
 Complete with bogies, again testing the new VSX bogies that are coming with the FQX project.
Again the casting has been soaked in isopropyl alcohol to remove the support wax, but otherwise it hasn't been cleaned up. Again "good enough", and with some time can be made better.
This version includes the tie down rail and the strap reals. and the rerailing points over the bogie centres, very plased at this detail and how it is represented.
 This is how it looks out of the alcohol

The other end in undercoat, this is the worst side.

This side shows the tape reals.
One more lot of tweaks and it will be available for sale.
Cheers
Rob

Again the casting has been soaked in isopropyl alcohol to remove the support wax, but otherwise it hasn't been cleaned up. Again "good enough", and with some time can be made better.
This version includes the tie down rail and the strap reals. and the rerailing points over the bogie centres, very plased at this detail and how it is represented.


The other end in undercoat, this is the worst side.

This side shows the tape reals.
One more lot of tweaks and it will be available for sale.
Cheers
Rob
Sunday, January 12, 2014
QR Model
Today I picked up the QR test print from ShapeWays. I have painted it in undercoat and fitted bogies and couplers
I have deliberately not cleaned up the model, this is how it arrived. First the good side:
Then the not so good:

Note in the second picture I was testing two different bogies, the new ones that are coming with the FQX project on the left, Micro-Trains on the right. Couplers are Microtrains 2001 couplers.
The unpainted model looks like this:

The cutouts in the underframe are to allow the wheels room to swing while giving a nice low riding height which the 2001 coupler allows.
Once undercoated the detail stands out :)


A few things to tweak then it is ready.
Cheers
Rob
I have deliberately not cleaned up the model, this is how it arrived. First the good side:

Then the not so good:

Note in the second picture I was testing two different bogies, the new ones that are coming with the FQX project on the left, Micro-Trains on the right. Couplers are Microtrains 2001 couplers.
The unpainted model looks like this:

The cutouts in the underframe are to allow the wheels room to swing while giving a nice low riding height which the 2001 coupler allows.
Once undercoated the detail stands out :)


A few things to tweak then it is ready.
Cheers
Rob
Subscribe to:
Posts (Atom)