Saturday, December 28, 2013

Got Ballast? QN and QR wagons

In between surfing sessions, and late at night, I've been taking the opportunity of summer holidays to do some more 3D modelling...

I am very pleased at how the QN wagon has come together. I have learnt a few new techniques doing this model, such as copying geometry. I have also found that Cubify design does not like working on the origin... it is better to place the wagon so that it is clear of the origin so everything is positive or negative.


I have the QR at the printers, it should be here along with a new version of the VFTY in a week or so.


Need appropriate bogies for them as well :)


What to do next....

Cheers

Rob

Saturday, December 21, 2013

Another FQX Update

I returned home this weekend to find a parcel from China with the final samples. I am very pleased with the results, hope you are too! Click on the pictures for a bigger view.

Preorders with a $10 discount are still available until the 13th of Jan.


The etchings and detail on the ends, including wire hand grabs and the brake hose.

 There are four different body styles. Two for Vic, one for NSW and one for SA.

Two different brake gear setups (Vic/SA and NSW).

It will be a shame to cover the deck with containers...

These models will go around a 9" curve (greater is much better, around 11" is what I recommend) and track nicely unloaded.

The bogies are to our own design and the model is fitted with Micro-trains 2001 couplers so the riding height of the model is nice and low.


Cheers
Rob


Tuesday, December 10, 2013

FQX Update

Here is a picture of the assembled and painted samples.


Waiting on some more wheels to be produced then the models should be shipped.

Cheers

Rob

Some More 3D

Hi everyone,

have recently returned home after three weeks overseas for work, including Canada with a foot of snow and -17 degrees... brrrrrrrr

Before I left I sent a few items off to the printers, I was really looking forward to coming home to see them :)

the first is one of the most requested Victorian models in N scale. A few have been scratch built, however they have proven very difficult to cast due to their long length and delicate uprights.

The VFTY were built in 1979 used for carrying timber as a replacement for the IT wagons, many of which were being used on the Orbost line and pass through Nowa Nowa... so I had to have some.


I have a little bit more detail work to do and a slight rethink on the underframe as it is bowing a little (although it is is bowing "up", a bit like the real wagons). These will then be sold on Shapeways as a three pack for around $65. I will sell decals, couplers and bogies separately.

I also wanted to see how far I could push things, so I made this staff exchange platform :


It is designed to be buried in the ground, I have done two versions, with and without the back railing.

I am very happy with both projects, more to follow when I can get more time!

Cheers

Rob


Wednesday, October 23, 2013

More 3D modelling

I have received prints from my 3D modelling efforts, the most complete being a Melbourne Z class tram.

This is how it looked when it arrived.


This is direct from ShapeWays in Frosted Ultra Detail.

I also made a new chassis to accommodate the parts from a Tomytec TM-TR01 tram.


The parts clipped in like they were made to fit :) I subsequently added a DCC chip to it and undercoated the tram body.


It then spent a happy day running around at the Seymour exhibition on a T-TRAK layout.


The W workers van shows a lot more "noise" from the production process. I have fixed a few things and will reprint before I see how it goes cleaned up.


I also had a go at printing the side shunters steps for the ZL guards van project, I was struggling to do this in brass, and this has worked very well with the parts sticking to the delrin underframe using Selly's Plastics glue. I can finnaly get this project underway, I have had the castings for around a year now!


The quality of these most recent prints from Shapeways has been really good, much better than I expected. I'm really getting the hang of it now, it really is opening up opportunities to do small or one off projects.

I have drawn a few other things that I will soon send off for printing.

Cheers
Rob


Sunday, September 8, 2013

Modelling Trains in 3D using Cubify Design Part 1

G'Day all,

life has gotten away from me recently; however, I've currently had/got a few days off in between changing jobs... and this is one of the things I'm getting up to!


The use of 3D modelling and Rapid Prototyping to make trains, and other railway items, has been growing and improving. I have posted pictures over the last 12 months of models made this way by Rob Popovski and Colin Bolin. I also have dabbled a little bit with minimal effect about 9 months ago trying out a range of products (see more below), this made me  realise that if I was going to be serious I needed to commit solidly to a single product intensively over a period of time.

Predictions are that in 2014 Rapid Prototyping will explode in quality and drop in price with several key patents no longer enforceable. Therefore I seized the opportunity to allocate some of my limited spare time to giving 3D modelling another go... staying up into the early hours of the morning several times as a consequence as I nutted things out.

About 12 months ago I tried a range of programs including Blender, Sketchup, AutoCad like products and had a bit of a play with professional parametric software, importantly including the product Alibre Design (now called Cubify Design or Geomagic Design).

I watched a number of tutorials for several parametric programs that are available on YouTube. I really liked how parametric modelling worked, and it is the style that all the new, better and industrial grade 3D software use (apart from AutoCAD).

So recently I quickly reviewed the market place again, trying out CorelCAD in particular as I use CorelDraw for my 2D drawing. CorelCAD is "similar" to AutoCAD, and it didn't really work for me.

So I jumped into the new Cubify Design, paying my $250 to the Australia distributor (you can get a 30 day free trial to try it out)... and haven't looked back with several nights of post midnight fun designing stuff!

I have now learnt a fair bit now, still lots to go, but while I am still a beginner I am almost competent in the basics, so a good time to capture what is important!


In parametric modelling the are two basic things you do, "add material" and "remove material". You do this by first drawing a 2D shape (or primitive) on one of the "planes" (with XYZ you have XY plane, YZ plane and ZX plane), this is done in "sketch mode". This primitive can be simple, like a square or circle, or quite complex, like the outline or profile of a train.


Sketches can be changed and edited later, elements "copied" into a new drawing (to help with alignment or spacing), importantly including from the drawing mode which enables you to trace diagrams and plans (more on that later).

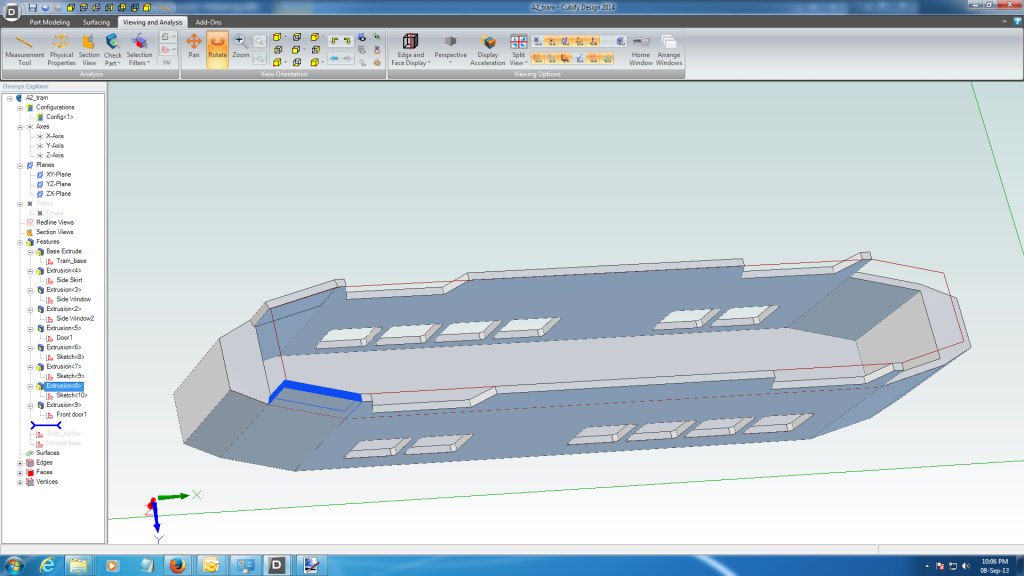
This sketch is then "extruded" a certain distance. This then turns edges into faces, creating your first "solid".  You can then rotate and admire your creation!


You can now select any face and draw a new sketch on it. This new sketch can then be extruded again (think of a box on a box). The sketch can also be used to cut into an existing solid, for example to hollow out the inside of the body.

To do this I selected the "underneath" face, and drew a simple box using the edge as a guide. I then used the "offset" command to make the sketch 1mm smaller all round (this will give me a 1mm "shell"), then deleted the original, closed the sketch then did a cut extrude into the body, giving a result like this.


These are the basic's, however I'm starting to build up some tricks which I plan to document further.

I have struggled with "constraints"; however, am starting to use them to good effect. I need to learn more about reference lines and how to use them as well.

The real key is that each sketch should be of a single feature (or a collection of like features, in the case above the grooves for the vertical boards) that is extruded or cut the same amount. It has taken me some time to move from the 2D world where it is all on the one drawing, a big no-no.

The real skill is trying to work out how to break down the model to allow this, and the best sequence to do it in. What I like about the parametric modeling is that you can change the order of the sequence by simply dragging and dropping the sketches and extrusions on the left had side of the work space to a new order. You can go back and edit any sketch and extrusion at any time. In this way you don't have to get it right first time but can refine the model over time.

I am having "fun" working out how to do compound curves for the celestry roof's of VR rollingstock...I'm getting closer!

Cheers
Rob


Friday, May 17, 2013

FQX Production underway

G'Day All, the factory has advised that production is now underway on the FQX project


This picture shows the diecast underframes being polished in preperation for assembly.

The plastic parts are being shot at the moment after a couple of final tweaks.

Cheers
Rob


Wednesday, May 15, 2013

N Scale NR's

A quick update, thanks to Colin Bolin Aussie N Scalers now have ready to run NR class locos. These are from 3D Rapid Protyotype master, cast, assembled and painted by Colin on Atlas mechanisms. They are now available from Colin or online from Aust-N-Rail.


Cheers

Rob

Tuesday, April 16, 2013

Australian N Scale Convention Part 2

There were a number of new products available for the convention, the first group I wish to highlight are from the skilled hands of Robbie Popovski and Colin Bolin. These models were drawn in 3D, printed in 3D, painted and with decals from an Alps printer... These models will be available Ready To Run from Aust-N-Rail later in the week and will be made to order in small batches.

First off the McKeen rail car! HO'ers eat your heart out ;) An unusual model that captures the prototype well. It is on a TomyTec mech and runs sweetly.


Keeping in theme we also have the DERM also on a TomyTec mech:


Moving forward and still with a passenger theme is the NSW XPT with a variety of coaches available:


Finally the AN.


Surely a boon to modellers of many eras!


Australian N Scale Convention part 1

Sorry for the long delay, where did the time go! haven't been doing much modelling, just keeping my head above water; however, last weekend I attended the Australian n Scale Convention here in Melbourne.

It was a fantastic couple of days and full credit to the organisers for a superbly organised event at an excellent venue. Numbers wise it was the largest Australian N scale convention so far, so well done!

One of the highlights for me was seeing the plans Ross Balderson, the builder of award winning N scale layouts "Sydney Central" and " Captains Flat"  has for "Newcastle circa late 1800's"... yes that is right late 1800's in n scale complete with sailing ships and more...

The first key building is well underway, the Customs House. Here are a few pictures:


All scratch built from plans and measurements. Nothing more I can say other than hurry up Ross, we are all keen to see more!

Cheers

Rob