Sunday, November 27, 2011

Advertising U Vans

Over the last few days I've been working on a number of projects for customers and myself. One that has been on the list for a while has been additional advertising U vans using the Signs Of All Kinds Alps printed decals (http://www.aust-n-rail.com.au/category6_1.htm) on one of my undecorated U Vans ANR 3868).

First I open the decal and apply a light coat of Testors Decal Bonder to the decal (http://www.testors.com/product/0/9200/_/Decal_Bonder) in case the decal film is weak or old (the decal bonder applies a new film layer, just don't make it too thick). Set it aside to dry for a few hours.

Then taking an undecorated U van out of the pack remove the roof by holding the long side on both side and pulling it off with a firm pull. Remove the body from the chassis by depressing the tabs you will now see. Depending on the paint scheme you may need to paint the roof separate to the body, or combine it and paint as one assembly.

Now paint the model then once dry apply a cleat gloss coat (I use Tamiya TS 13 in a spray pack). Apply the decals using water and once positioned dry off the water. Now comes the important part, to get the decal to snuggle down into the louvres apply Microscale Microsol. This may need to be done several times (1 did 4-5 applications on the models below). Once dry apply a matt coat (Testors Dullcote).

Cane-Ite
Painted all over in Badger Modelflex/Accuflex Light Oxide Tuscan Red (My "standard" colour for VR wagon red of late 70's onwards)
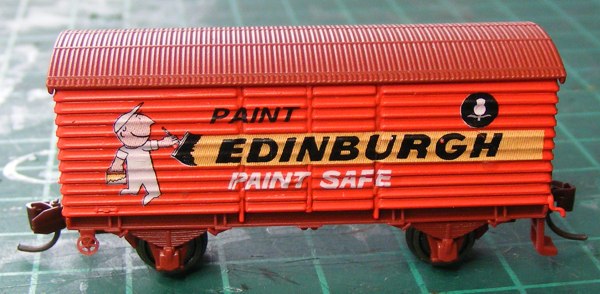
Edinburgh Paints
Roof Modelflex/Accuflex Light Oxide Tuscan Red, side Badger Modelflex/Accuflex Southern Pacific Scarlet Red.

Orlando Wines
Body roof in Badger Modelflex/Accuflex Maroon Tuscan Oxide Red (older VR brown/red), side in the colour I use for AN green (Badger Modelflex/Accuflex Burlington Northern Green with a dash of black).


Better get back to finishing the other models :)

Wednesday, November 23, 2011

Brass Tank Stand

The stand for the water tank was quickly made out of styrene strip for a show. The intent was always to do a brass one to give greater strength. The problem was getting brass angle that was fine enough which I finally did from here :http://www.metalsmith.co.uk/

So here are some pictures of the new stand with the old platform and tank. I have used the 1mmx1mm angle throughout, although the diagonal cross braces should be a little finer.


Now the stand is much strong and will take bumps better!

Thursday, November 17, 2011

Victorian N Scale Collective Meeting Oct 2011

Catching up on a couple of missed months due to work :(

The Victorian N Scale Collective (http://home.vicnet.net.au/~vnsc/) October meeting was hosted at my place in Seymour. We had an excellent turnout with many north central country members able to make the drive.


Here is a picture of some of the crew enjoying a chat.


Inside more of the crew spent time actually running trains. Despite the photo evidence they said they did enjoy it... maybe they are reconsidering not modelling the East Gippsland line... Darren looks happy, but then he IS modeling the East Gippsland line.

In addition to my layout we had Tony Lamplough's "Fish Creek" set up. More on that in the next blog.

The VNSC are a great and growing (over 80 members) bunch of keen N scale modellers of all ages and modelling skills. I can highly recommend joining them if you are modelling Victorian Railways, or N scale in general!